My Controller Is Working. Why Won’t My Vents Run? Why Won’t My Side Curtains Roll?
Note: greenhouse controllers contain potentially hazardous voltages and should be serviced by qualified personnel only. These procedures are written for qualified personnel.
“It’s getting hot in here, and my vents won’t open.” Okay, first things first: save the crop. Time is important here, so let’s start with things that are quick and easy: circuit breakers and/or fuses.
Check for tripped breakers on the outside of the unit. There are usually two push-button breakers on the bottom or side of the box, which are reset by pressing them in. Next, check for tripped breakers inside the controller. There is usually one breaker for each set of motor terminals. They look like fuses, and in fact fit the same sockets as fuses, but are breakers with a button that extends when tripped. Pressing the button will reset them.
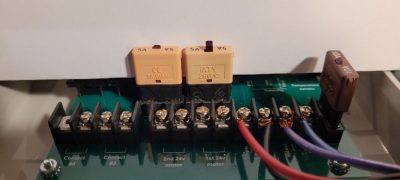
Fig 1. motor breakers: reset (left) and tripped (right)
Interface boxes equipped to drive DC motors normally have glass fuses, two for each motor channel. If resetting the breaker doesn’t solve the problem, or if the breaker trips again, inspect the affected vent for physical obstructions. In the case of rollup curtains, make sure that the curtain is rolling and unrolling neatly. DC motors draw current proportional to their load, so if a breaker is tripping it is likely that something is causing the motor or actuator to be overloaded.
With the easiest solutions now behind us, let’s get the vents open and look deeper. First, we’ll look for problems outside the controller, then inside. Many installations have no provision for manually rolling up the curtains or operating the roof vent. Any 18 or 20 V Milwaukee or DeWalt battery for cordless power tools, however, will get your vents to open or close. Note that there are five battery terminals where the battery normally connects to the tool. With the motor wires disconnected from the controller, make contact between the two motor wires and the outer two of the five terminals on the battery. This will cause your vent to operate. Simply reverse the wires to run the vent in the other direction.
Now that we have some breathing room, let’s troubleshoot further. The “battery trick” also serves as a test. If it works, we know that the problem is within the control circuits. If it doesn’t work, we know that the problem is in the motor circuit, not in the controller.
A visual inspection is always a good first step in troubleshooting anything. Do the connections and wiring appear undamaged? How about the motor or actuator itself? Are the rollup curtains rolling up or down neatly? Are there any physical obstacles in the way? If it is a hinged vent, does it move freely? Is it lubricated, including any rack-and pinion mechanism?
Check for continuity with an ohmmeter from the end of the motor wire. Most DC actuators and motors used in greenhouses have less than 10 ohms of resistance when at rest with no voltage applied and can look almost like a short. Even with long power wires to the motors, the resistance should measure only a few ohms. If the connecting wires are a suspected cause of the issue, the battery test can be done through short leads right at the motor or actuator as a final test of the unit itself.
At this point we have either set the vents where we want them and need to troubleshoot the controller or found the problem with the motor circuit and are taking steps to repair or replace it. If the motor circuits are all working, let’s check the operation of the relays. Using the front panel controls, manually operate the vent control while observing the relays. A relay should respond with a green light when controlling a vent in one direction, and a different relay should respond when running the vent in the other direction. A key sign of a failed relay is if the relay indicator light illuminates, but the known-good motor does not run. For a further explanation of relay operation, see the Advancing Alternatives paper “Understanding and Application of Contactors and Relays”.
The controller contains two DC power supplies. One provides highly filtered and regulated 24.0 V DC for the display and logic circuits. The other is to provide power for the motors and is less regulated, measuring about 26-29 V DC depending on the model. This power is fed into the relay board on two wires. Locate this voltage input on the relay board and measure it. If no breakers are tripped and there is no voltage present, it is likely that the rectifier has been damaged and must be replaced. The rectifier is available from Advancing Alternatives. When replacing, note the beveled corner and its position with relation to the location of each wire as the unit will not function if the rectifier is not properly placed and wired. It is good practice to take a picture before removing the old rectifier.
If you have followed this step-by-step procedure, it is likely that you have identified the problem with your vents. If, after exhausting these measures the system is still not operating, contact Advancing Alternatives for further help.